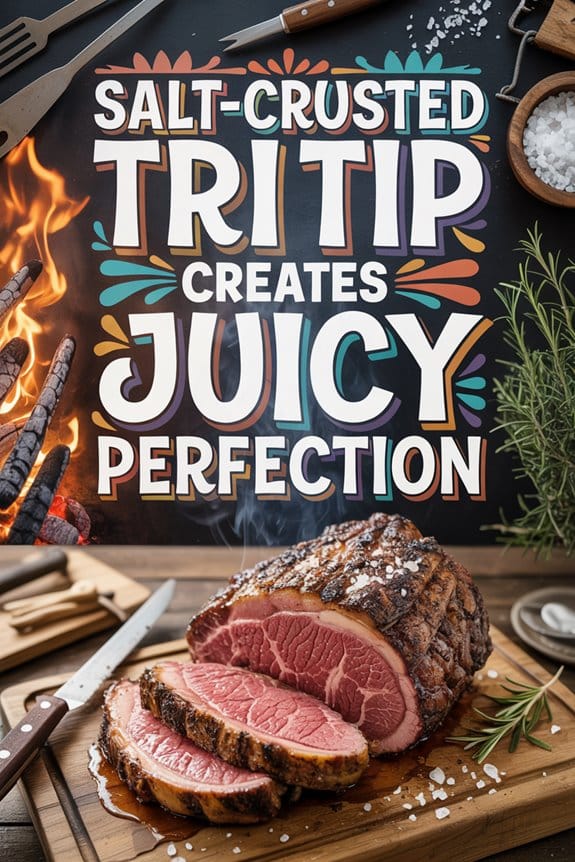
The Simple Joy of this Salt-Crusted Tri Tip
Simplicity meets excellence when you coat a tri-tip roast in seasoned salt and let time do the heavy lifting.
I’m talking about four tablespoons of Lawry’s seasoned salt creating magic on two pounds of beef. That’s it. No fancy marinades, no complicated spice blends that require a shopping list longer than my grocery budget allows.
The salt forms this incredible seal around the meat, and honestly, watching that roast transform from its unappealing cryo-bag state into something gorgeous is pure kitchen therapy.
Sometimes the best recipes are the ones that don’t try too hard.
Ingredients
This recipe is invigoratingly minimal, which honestly makes me feel less intimidated in the kitchen. You’re basically working with two main players here, and that’s the kind of simplicity that speaks to my soul when I’m staring into the refrigerator trying to figure out dinner for the family.
Ingredients:
- 2 lbs tri-tip roast
- 4 tablespoons seasoned salt (Lawry’s recommended)
Now, let me tell you about these ingredients because they’re doing more heavy lifting than you might think. The tri-tip roast itself comes looking pretty sad from those vacuum-sealed bags, all compressed and frankly unappetizing, but don’t let that discourage you. As for the seasoned salt, Lawry’s is specifically mentioned here, and there’s probably a good reason for that. Different seasoning salts have varying levels of sodium and different spice blends, so if you’re thinking about substituting, just know that your results might vary slightly. The beauty of this recipe is that you don’t need to hunt down exotic ingredients or worry about having a perfectly stocked spice cabinet. Two ingredients, and you’re basically a backyard pitmaster.
How to Make this Salt-Crusted Tri Tip
The process starts with coating your 2 lb tri-tip roast with 4 tablespoons of seasoned salt, and I mean really coating it—you want that salt creating a complete seal across the entire surface like you’re wrapping it in a salty blanket.
Once you’ve got your roast looking like it’s been thoroughly pampered at a mineral spa, tuck it into the refrigerator for 3-4 hours, and this timing matters more than you might think. Don’t get ambitious and leave it overnight because apparently good things come to those who wait, but not those who wait too long.
About an hour before you’re ready to fire up the grill, pull that baby out so it can come to room temperature, which helps everything cook more evenly.
Now comes the fun part where you get to play with fire, sort of. Set up your charcoal grill for indirect cooking—think of it as creating zones where some areas are hot and some are just warm and cozy. While charcoal grilling offers that authentic smoky flavor, a premium outdoor grill with precise temperature controls can make maintaining those crucial heat zones even easier.
Here’s where things get a little specific: you absolutely want to use a grilling rack instead of placing the roast directly on the grill grates, because otherwise you’ll end up with those crosshatch grill marks scoring your beautiful roast, and nobody wants their tri-tip looking like it lost a fight with a tic-tac-toe board.
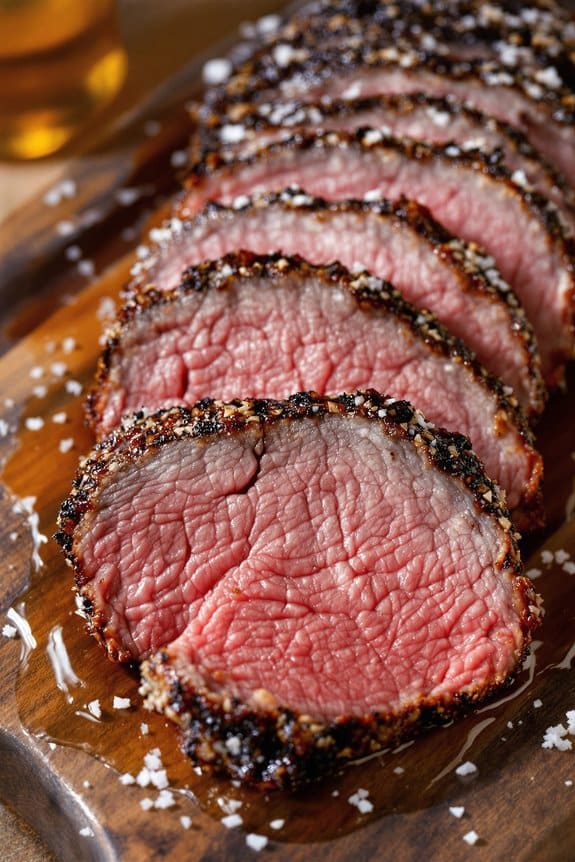
Keep that grill covered and maintain the temperature between 375-425 degrees during the first half hour. After 20 minutes, flip it once, then check the internal temperature after 40 minutes total cooking time, aiming to pull it off when it hits 135 degrees internal temperature.
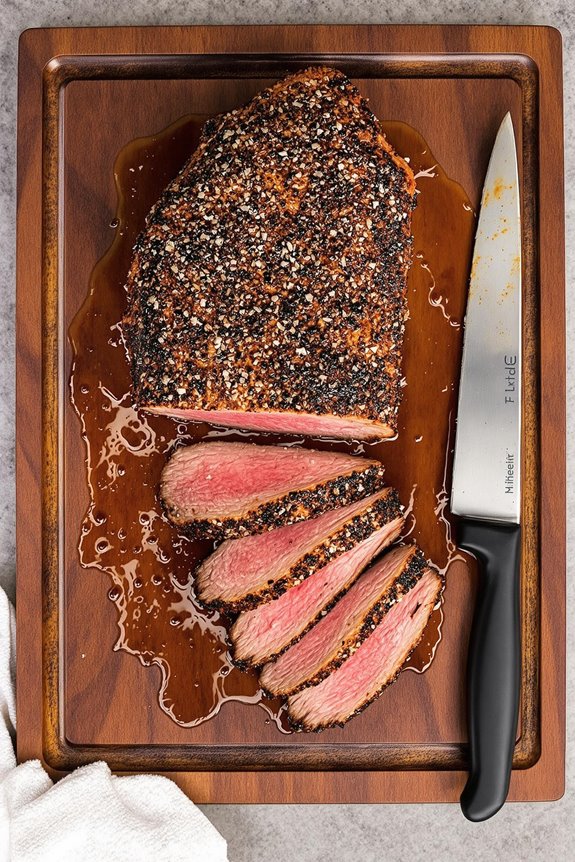
The magic happens while it’s cooking—that salt seal does something almost mystical where the roast actually changes shape and expands within its crusty layer, sometimes puffing up like a little pillow of beef goodness.
What started as an unattractive hunk of meat from a vacuum bag transforms into something with appealing colors and small burnt edges that make your mouth water.
Once you pull it off at 135 degrees, let it rest for 10 minutes before slicing, and prepare yourself for the flood of juices that’s coming—we’re talking easily half a cup or more, so make sure you’ve got a cutting board with deep grooves unless you want your counter looking like a crime scene.
When you’re ready to slice, pay attention to the grain direction because it changes throughout the roast, and keep those slices thin and small so they work perfectly for sandwiches.
Substitutions and Variations
While that classic seasoned salt approach works beautifully, you don’t have to stick to Lawry’s like it’s some kind of sacred culinary commandment—plenty of other options can create that same magical crust we’re after.
I love experimenting with garlic salt, onion salt, or even celery salt for different flavor profiles. You can also mix your own blend using coarse kosher salt with dried herbs like rosemary, thyme, or oregano.
Want some heat? Add cayenne or smoked paprika to your salt mix. The key is using enough coarse salt to form that protective seal we need.
Additional Things to Serve With Salt-Crusted Tri Tip
Once you’ve nailed that perfect salt-crusted tri tip, you’ll want sides that can hold their own against all that bold, smoky flavor without getting completely overshadowed.
I always reach for grilled vegetables—asparagus, zucchini, or bell peppers work beautifully. Their char complements the meat’s smokiness perfectly.
Garlic mashed potatoes? Absolutely essential for soaking up those incredible juices.
Don’t forget crusty bread either, because wasting that liquid gold would be criminal.
For something fresh, I love a simple arugula salad with lemon vinaigrette. The peppery greens cut through the richness nicely, creating balance on your plate.
Final Thoughts
After five decades of grilling everything from burgers to brisket, I can honestly say this salt-crusted tri tip technique stands out as one of my absolute favorites.
The simplicity amazes me—just seasoning salt and time create magic. When you slice into that perfectly pink center, releasing those savory juices, you’ll understand why this method converts skeptics instantly.
The salt seal transforms an ordinary Tuesday dinner into something special. Trust me, once you master the grain direction and achieve that 135-degree sweet spot, you’ll never want plain grilled tri tip again.
This technique simply delivers consistent, restaurant-quality results every single time.